
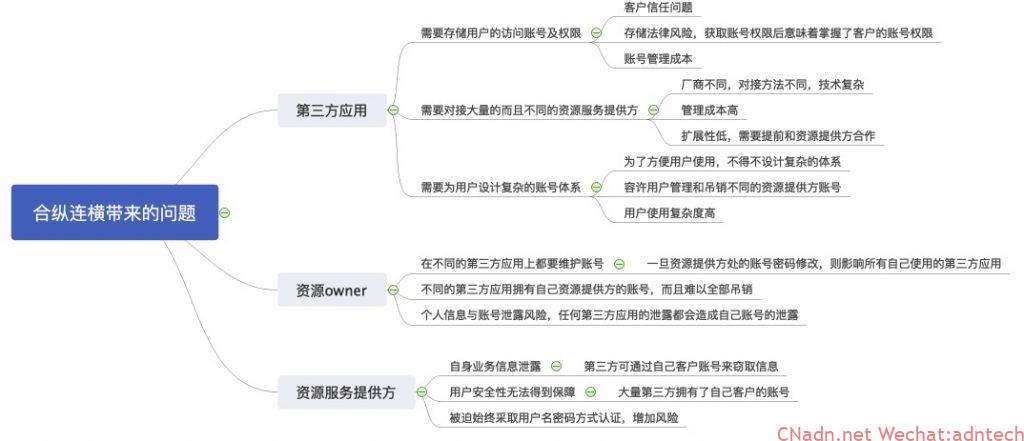
Nowadays, the Internet has penetrated various life and business scenarios. Just like people have never been a simple individual in real life, we need to have many complicated relationship networks. The same is true of Internet applications, and it is now difficult to see which application can develop completely independently without having a relationship with its surroundings. Therefore, today’s applications are very particular about their own ecology, and they need to share a lot of information with each other. These complex relationships raise a very important issue: identity authentication, resource authorization, and account maintenance. Of course there is API authentication access control.
For example, in your daily life, you may need to use dozens of apps. Each of these apps has an independent account and password. You need to maintain different accounts and passwords. You may have one set of accounts for all apps in order to save trouble. Password, so after the application A was violently vaulted, you are forced to change all the passwords of the accounts of these dozens of apps. You may also be more concerned about the security of your account, so you use a fixed + changing password to combine dozens of APP accounts, which is very good, can help alleviate a large part of security issues, and at the same time reduce your password maintenance. Question (Is the memory okay), but these apps may not be able to follow the fixed + change mode you envisioned as you wish, some may only support numbers, some support numbers plus passwords, and some still It requires a minimum length and a more complicated combination, so you start to use a small book to record the password format of different applications (well, at least there was a stage where I did this, recorded in a description language on the computer, when forgotten At that time, go to find this hint in the computer).
Is there a better way?
If you trust a company that has done well in security and has a good reputation system, can you use this account to run the Internet? I believe we already have the answer. Today, we may have used it a lot of times. When you log in to the XX application, you are used to skip user registration and go to click “log in with ***”, in the pop-up interface Here is a very sacred point under “Agree”. So you no longer need to remember so many application accounts. This is actually a typical open authorization (Open Authorization) referred to as oAuth (current version is 2, also known as oAuth2).
Um, you seem to be lying to me. You have said so much, it seems to be all about authentication, why it is said to be Authorization. Yes, you are right, but I did not lie to you, but there are some silly problems that are not easy to distinguish. The original purpose of this oAuth design is to solve the problem of data access between interest groups, just like us As mentioned at the beginning, there is a problem of mutual access to a large amount of data between applications of different companies. For example, company A has developed an online photo printing application, but this company does not operate photo storage services. Your photos may exist in B, C, D. On the network disks of different companies (Yes, in order to take advantage of the early days, I did occupy a lot of the network disks of many companies. Later, some of their network disks used rogues to send a notice and couldn’t do anything. Fortunately, I used RAID1), so this caused problems. How do you send photos to this online printing company, download them from the BCD network disk and send them to them? Give the account number and password of the network disk to the printing company? Obviously these methods will not work. If you rely on downloading and uploading, it is estimated that you are too lazy to get it. If you are giving an account password, unless you are not sober.
For printing companies and network disk service providers, they also have similar troubles. If users are allowed to upload and download, the user experience is too bad, and they also maintain a whole set of such systems. Therefore, printing companies hope that there is a simple way to connect at the same time. BCD network disk company, as long as one of the users of these network disks agrees, it will automatically pull down the user photos from these network disks to print, and own 0 inventory. For the BCD network disk company, storing cold data alone is obviously not the purpose. Moreover, you are still in piao, you have to do tricks, so the network disk company also wants to dock these companies that print pictures, but for them It is necessary to solve the user’s security issues on accounts and photos.
So it can be seen that for these three different stakeholders, there is a desire to have something to solve their problems at the same time. This is authorization. When the user wants to print the photo, the printing company guides the customer to enter the network disk interface. The user is Log in to the network disk and authorize the network disk to allow which of my resources to be shared with the photo printing company. For example, share your beautiful photos to print, and the original photos are not allowed to be accessed by the printing company, which is very safe. So we can summarize:
oAuth is used to solve such a scenario, so you can see that it is an authorization process. But you haven’t said why it was a certification at the beginning, hmmm. After all, I also spent a lot of time to learn it. It is also a process after finishing it. Just like this article, it is a series. Only the following articles can be finished:
- NGINX as (Client) role and resource service role proxy in oAuth, Authorization code mode (with oAuth proxy service)-this article
- NGINX as (Client) role and resource service role proxy in oAuth, Authorization code mode (Without the help of oAuth proxy service)
- NGINX authenticates and recognizes id_token in OIDC (Implicit mode)
- NGINX acts as a resource service role in oAuth, proxy authentication and identity information recognition (Token introspection)
Why is authentication involved here? In fact, you will find that during the authorization process, the identity is obviously inescapable. The authorization must be based on a certain user, so the oAuth specification does not emphasize that you can’t do this. In addition to authorization, plus sometimes, we really do not need authorization scenarios, but want to reduce our account maintenance, use one company account to log in many products of other companies, so there are a lot of oAuth For authentication scenarios, of course, it is precisely because oAuth does not make many standardized definitions for authentication, which leads to different designs of programs of different companies when implementing authentication. There is no standard way to obtain user information. A common standard scope, based on this, OpenID Connect (OIDC) appeared. OIDC is based on oAuth. The communication process of several parties is the same. The difference is that OIDC is sending to IdP (the party that stores the account and performs verification). When the request is initiated, the openid tag will be brought in the scope. In the end, the information returned by the IdP will also carry an ID token (JWT) in addition to the oAuth normal access_token, and the application can use it as a login after getting this ID token. If you need more additional information, you can take the access_token and go to the userinfo endpoint to get more user information. In addition, OIDC is a protocol family and contains many other specifications, such as session management and registration discovery. Because oAuth and OIDC are very similar in communication mechanism, we often confuse the two. We often say that oAuth authentication should actually be oAuthZ, and OIDC is oAuthN.
Back to this article, in this article, we will follow the interaction of a standard oAuth authorization code mode to see what NGINX can help users do here, and why NGINX is needed to do such a thing.
First, we need to sort out the entire interaction process in the oAuth authorization code mode. In order to avoid the obscurity of RFC , let’s assume a scenario.
You are in a startup company, such as a company engaged in AI and big data (of course, it is not listed yet, it is listed, and you may not have time to read this article), your company uses a lot of cloud service examples, buy servers to engage in computer rooms , Engage in infrastructure, that is not a thing. You have used open source to build a lot of systems, and quickly put your business online. Everyone knows that open source systems have a great feature, which is friendly to developers. What does it mean, how is it convenient (that is, developers are lazy, non- To be straight…), so you see that many open source systems don’t think about authentication, and you visit it after installing it. It seems that there is no account authentication as a matter of course. At first, it didn’t matter, because you were alone, what You have to do everything, as more and more systems, employees begin to increase, you need to make some restrictions on access to different systems for different people, and you are still going to go public, as a public company, your system There is no account, so it is unreasonable. Then you have some application development systems that need to connect to the github API. You need to allow only some advanced developers to access a private repo. And you have no time to build a new user management system yourself. Fortunately, these people have github accounts, so you can use these github accounts to do the simplest and fastest things. These requirements can be summarized as:
A function needs to be implemented on different systems to enable these systems to interface with github, and use the github account to determine whether employees can access a certain system Log in with the github account on the application development system, and apply for resource authorization from github to include the person’s repo and other information. If the person does not have the private repo permission, the natural application development system cannot obtain the private under the permission of this employee. repo content These requirements oAuth can help solve, but there is a problem. If you join the oAuth mechanism, you need to develop on the system. So many open source systems, the development language is different, and even some systems dare not rush to redevelop. It is actually very difficult to achieve and the workload is actually very large.
Before looking at what NGINX can do, let’s take a look at the oAuth process without NGINX and the above requirements.
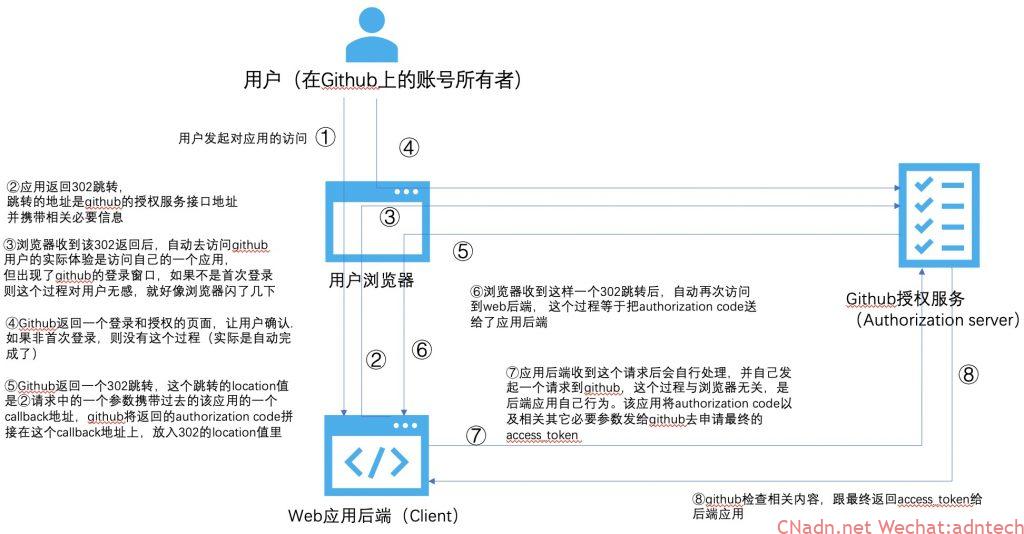
From the above process, it can be seen that for users, they log in and authorize once on github, and the browser makes two jumps. The really useful access_token is between the back-end application server and github. The user and the browser itself cannot see the content of this access_token, which is called the backend channel and is relatively safe. So what does the application do after getting this access_token?
-If it is limited to obtaining some basic information of the user, and the returned access_token is JWT, then the application server can obtain the content in the JWT by itself, so that the user information extraction is associated with some local user IDs, which can be used as Used for login (of course, if it is pure identity authentication and this joint login scenario, in fact, OIDC should still be considered). Of course, if the access_token here is opaque, then the application server also needs to do token introspection, that is, it needs to be verified again with the authorized party before the relevant information can be used.
-If it is not limited to obtaining user information, but to obtain additional resources, such as the need to obtain the person’s repo content, then the application server needs to access this access_token to access a github repo resource server (resource server and The authorization servers are not necessarily the same, and large-scale scenes are usually not the same) to obtain the person’s repo content, then the above picture becomes like this:
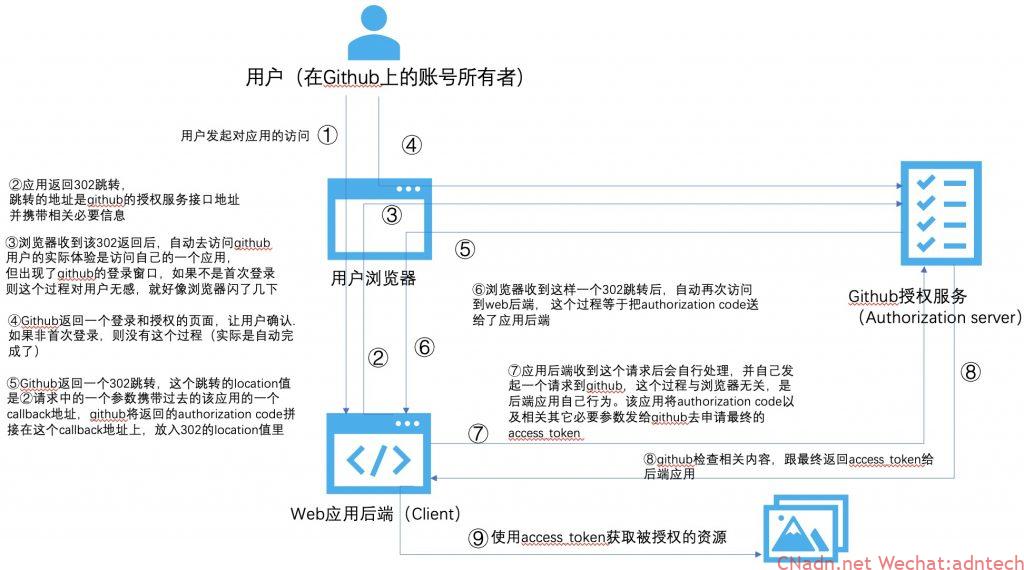
So, you will find that the web application backend is very critical. It participates in the entire oAuth process and finally obtains the access_token. Imagine, as you said at the beginning of the company, many open source are developed in different languages. System, you have to transform to add this ability. At this time, you actually only want to decide based on the user’s information that the system must be logged in through the oAuth process before it can be accessed, or the system determines who can access based on the user name.
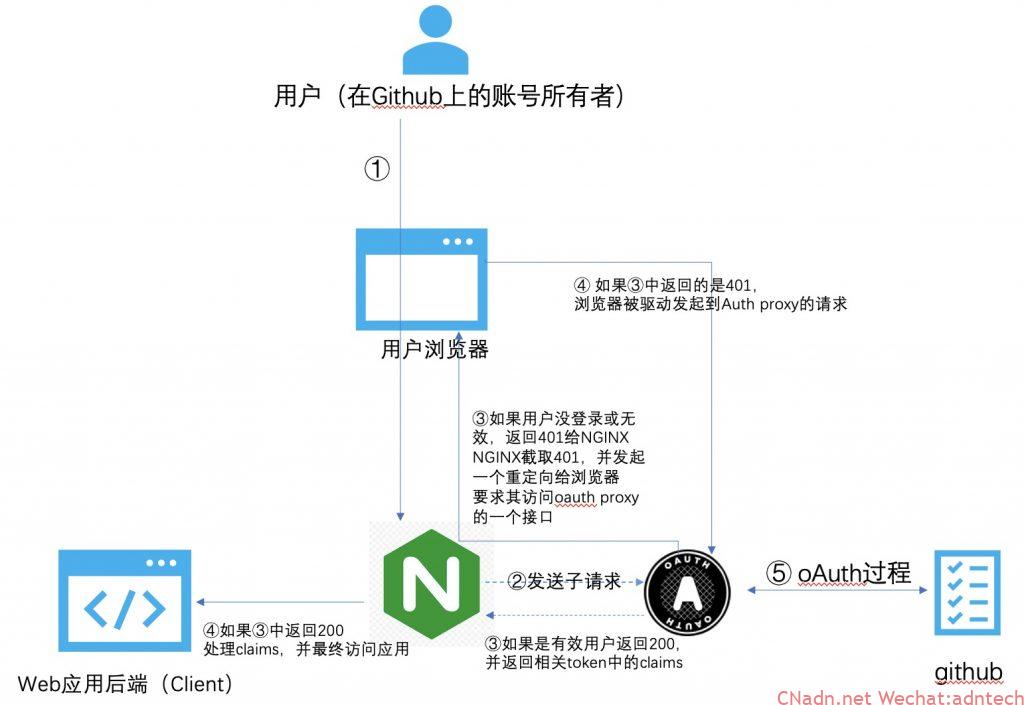
This work can actually be achieved by placing NGINX in front of the web application backend, which means that NGINX is allowed to participate in the oAuth authentication process on behalf of the backend application, and then NGINX can decide whether to allow or reject certain users based on access_token, or Transparently transmit user information to back-end applications for more processing.
Carefully observe the entire verification process above, which requires NGINX to participate in the construction of the jump return, and use the authorization code to construct the request to directly access the github authorization server. If these tasks are done purely on NGINX, it is actually very difficult. Development through njs is a way but requires the ability to authenticate JWT (so NGINX Plus does not need to install an oauth proxy service like the demo in this article, It can be realized by directly using the njs module + KV module + JWT module. For details, please refer to the second part of this series), but in fact, it can be achieved with the help of the ability of auth_request and an oAuth proxy, which means that we need to be in various The implementation code of the oAuth authentication process created on the open source system is abstracted to it, and a general one is involved. The oAuth proxy agent participates in this oAuth process, and finally the obtained access_token is parsed out. The relevant claims information is returned to NGINX, NGINX Based on this information, we will control whether to allow access to a resource, or transparently pass relevant user information to the final application. So its implementation logic is as follows:
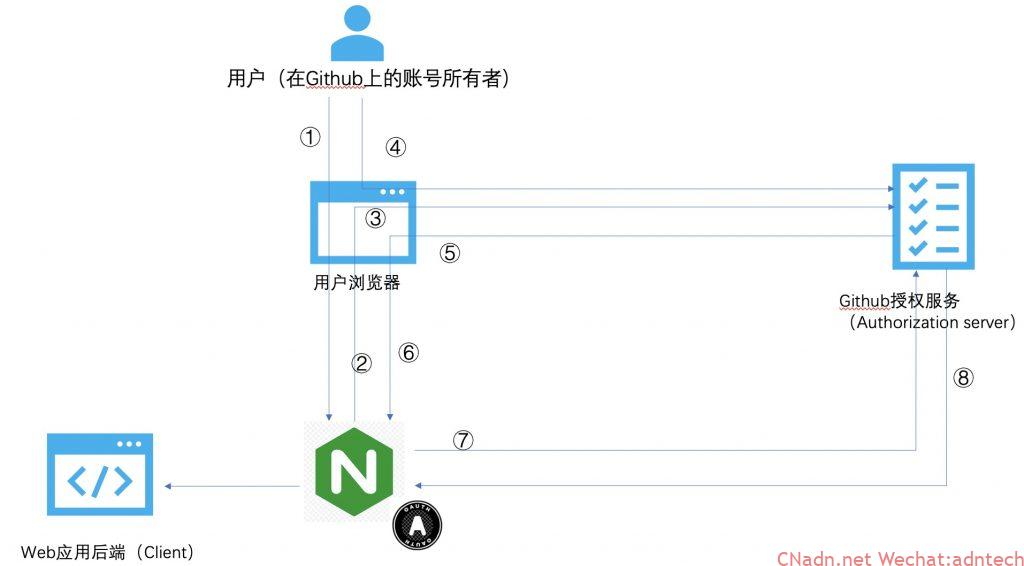
The idea and principle of implementation (the following serial number has nothing to do with the figure):
- Configure NGINX to publish protected applications
- Configure auth_request under the location section of the relevant application
- In this way, when the request reaches NGINX, NGINX will initiate the sub-request authentication by auth_request
- The sub-request will be proxy_pass to an interface of the oauth proxy service
- According to the characteristics of auth_request, it is necessary for oauth proxy to return the relevant status code to indicate whether NGINX is released or returns 401
- Therefore, after receiving the sub-request, the oauth proxy will determine whether the user has previously completed the relevant oauth authentication work. If the user has not logged in, or the validity period has expired, then the oauth proxy returns 401 (here depends on whether the user browser carries the oauth proxy Issued by a cookie information to check)
- NGINX intercepts the status of 401, and implements the definition of error_page to send a 302 jump to the user’s browser if 401 is returned. The address of this jump is actually a special interface of oauth proxy used to trigger the subsequent oAuth process. The subsequent process is no different from normal oAuth.
- After the oAuth proxy completes the entire oAuth process, it returns a 302 jump to the user browser, and this return will also carry the relevant cookie to allow it to revisit the protected application
- After NGINX receives the request, it triggers auth_request again. auth_request sends the request to an interface of oauth proxy again. This visit carries the cookie in 8. This way, the oauth proxy knows who it is based on the cookie, and resolves its access_token to pass relevant claims. Put it in the response header and return to NGINX
- Use auth_request_set to put the claims in the response header of the sub-request into variables and pass it to the parent request
- NGINX judges whether to release based on these variables, or puts these user information in the request header to pass the content to the last protected application
There are many implementations of such an oauth proxy online, here is a brief list: vouch-proxy
oauth2 proxy by lua -implement proxy directly in lua, no need to install additional proxy service
Demo
This demonstration uses NGINX plus and vouch-proxy to achieve. For the specific installation and configuration of vouch-proxy, please refer to its github directly, it is not complicated
In the actual demo, the web application backend actually has an intermediate NGINX to simulate, using return to return the content.
NGINX configuration:
############entry for protected app http://authcode.imesh.club/personalinfo
server {
    listen 80;
    server_name authcode.imesh.club;
    #root /var/www/html/;

    # send all requests to the `/validate` endpoint for authorization
    auth_request /validate;

    #The location is for auth_request subrequest
    location = /validate {
      # forward the /validate request to Vouch Proxy
      proxy_pass http://127.0.0.1:9090/validate;

      # be sure to pass the original host header
      proxy_set_header Host $http_host;

      # Vouch Proxy only acts on the request headers
      proxy_pass_request_body off;
      proxy_set_header Content-Length "";

      # optionally add X-Vouch-User as returned by Vouch Proxy along with the request
      auth_request_set $auth_resp_x_vouch_user $upstream_http_x_vouch_user;

      # these return values are used by the @error401 call
      auth_request_set $auth_resp_jwt $upstream_http_x_vouch_jwt;
      auth_request_set $auth_resp_err $upstream_http_x_vouch_err;
      auth_request_set $auth_resp_failcount $upstream_http_x_vouch_failcount;
    }

    # if validate returns `401 not authorized` then forward the request to the error401block
    error_page 401 = @error401;

    location @error401 {
        # redirect to Vouch Proxy for login
        return 302 http://vouch.imesh.club/login?url=$scheme://$http_host$request_uri&vouch-failcount=$auth_resp_failcount&X-Vouch-Token=$auth_resp_jwt&error=$auth_resp_err;
        # you usually *want* to redirect to Vouch running behind the same Nginx config proteced by https
        # but to get started you can just forward the end user to the port that vouch is running on
    }

    # for the real service that being protected
    location / {
      # forward authorized requests to your service protectedapp.yourdomain.com
     ##he backend real server also simiulated by this nginx
      proxy_pass http://127.0.0.1:8080;
      # you may need to set these variables in this block as per https://github.com/vouch/vouch-proxy/issues/26#issuecomment-425215810
          auth_request_set $auth_resp_x_vouch_user $upstream_http_x_vouch_user;
          auth_request_set $auth_resp_x_vouch_idp_claims_avatar $upstream_http_x_vouch_idp_claims_avatar_url;
          auth_request_set $auth_resp_x_vouch_idp_claims_company $upstream_http_x_vouch_idp_claims_company;
          auth_request_set $auth_resp_x_vouch_idp_claims_blog $upstream_http_x_vouch_idp_claims_blog;

      # set user header (usually an email)
          proxy_set_header X-Vouch-User $auth_resp_x_vouch_user;
      # optionally pass any custom claims you are tracking
          proxy_set_header X-Vouch-IdP-Claims-company $auth_resp_x_vouch_idp_claims_company;
          proxy_set_header X-Vouch-IdP-Claims-avatar $auth_resp_x_vouch_idp_claims_avatar;
          proxy_set_header X-Vouch-IdP-Claims-blog $auth_resp_x_vouch_idp_claims_blog;
    }
}
Simulation configuration of back-end applications
   server {
        listen 8080;

        location /personalinfo {
            default_type text/html;
            set $user $http_x_vouch_user;
            set $avatar $http_x_vouch_idp_claims_avatar;
            set $company $http_x_vouch_idp_claims_company;
            set $blog $http_x_vouch_idp_claims_blog;
            return 200 '<html><head><meta http-equiv="Content-Type" content="text/html; charset=utf-8" /></head><h2>Your personal info:</h2><hr />Name: $user <br>avatar: $avatar <br>company: $company <br>blog:$blog </html>';
        }
    }
Responsible for receiving the request configuration initiated by the client browser to the oauth proxy:
#######work for vouch login/auth
server {
    listen 80;
    server_name vouch.imesh.club;
    location / {
       proxy_pass http://127.0.0.1:9090;
       # be sure to pass the original host header
       proxy_set_header Host vouch.imesh.club;
    }
}
The effect of the visit process:
The first visit to http://authcode.imesh.club/personalinfo, the browser is automatically jumped to the vouch.imesh.club/login? interface, this jump is actually driven by NGINX
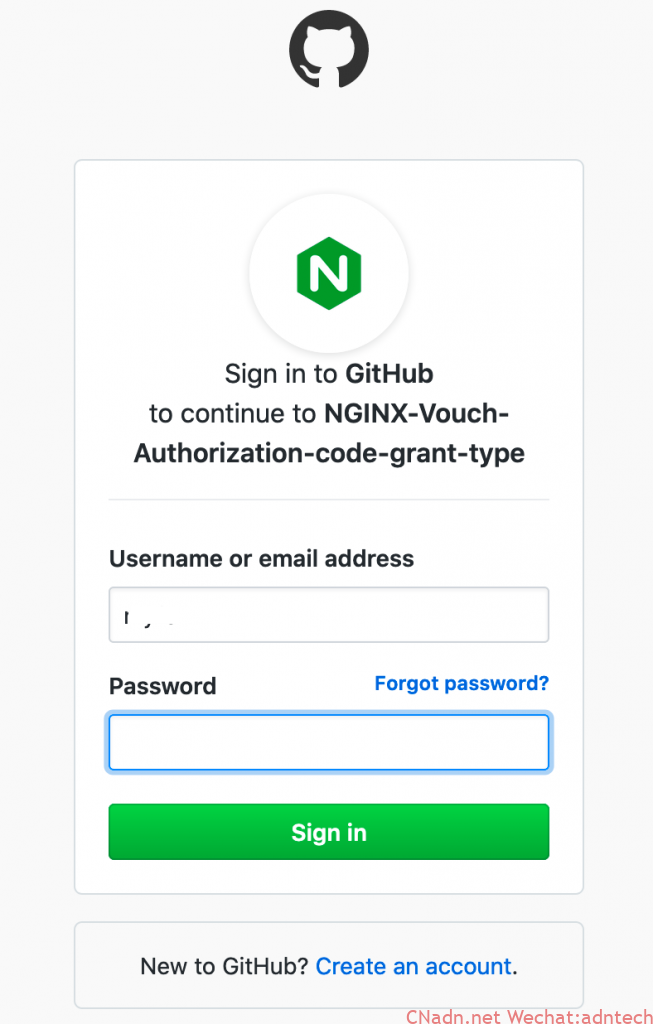
After receiving it, vouch.imesh.club processes it and asks the browser to jump to the github.com/authorize interface. Since it has not logged in on github, github jumps to the /login interface to let the user log in.
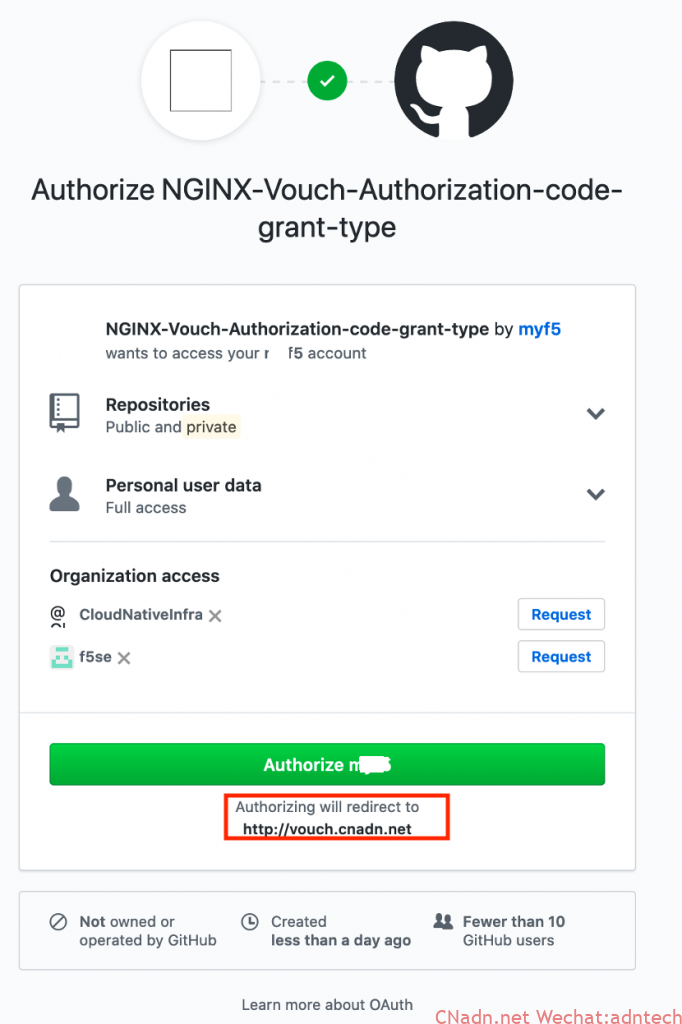
The login interface appears. After logging in, the authorization will be displayed. Clicking on the authorization will be redirected to vouch.imesh.club (the service address of oauth proxy), which actually returns the authorization code to the oauth poxy service.
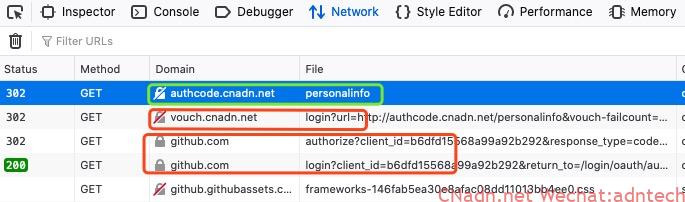
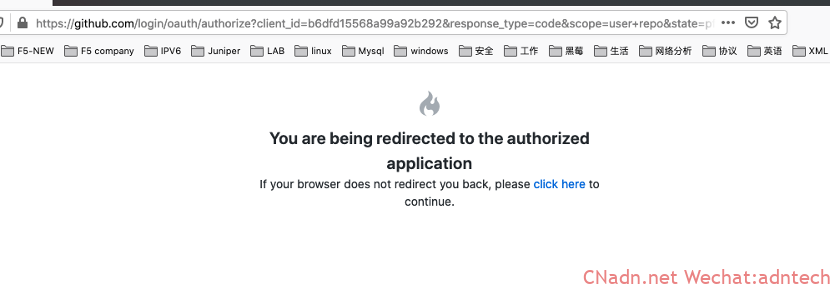
After clicking the authorization, the browser will continue to jump. The github implementation will have the following jump prompt, which is actually the browser to jump to the callback interface of vouch.imesh.club:
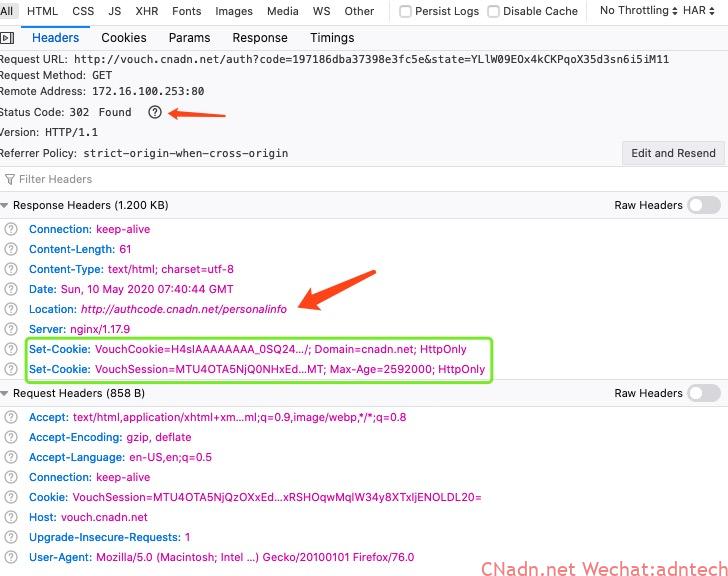
After the callback interface of vouch.imesh.club is accessed, it will drive vouch to initiate access_token acquisition on the server side. At this time, the browser cannot capture it. When vouch has been obtained on the server, it returns a 302 to the browser again. This 302 requires the browser to officially access the application address, and is accompanied by the relevant cookie to the client browser:
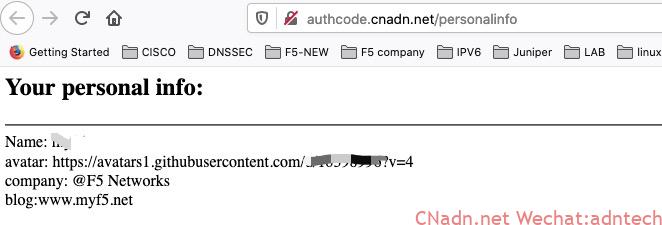
Finally completed the visit:
Summary
Use NGINX’s auth_request function, and through clever configuration to use oauth proxy to achieve the complete authentication process of oAuth, and pass relevant user information to NGINX to achieve access control and information processing. Except for the back-end, all applications need to develop code to implement oauth verification, so that enterprises can quickly use third-party accounts to control user access
Follow up
In this practice, the authorization code mode of oAuth is adopted, and the external oauth proxy service is used. If you do not want to rely on external services and want to implement on pure NGINX, you can refer to the second part of this series .
Check more oAuth posts of the series at my tech blog https://imesh.club/?s=oauth